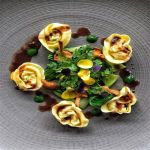
Chicken and Mushroom Tortellini
Servings: 4 people
Ingredients
- 400 g Manor Farm chicken mince
- 1/2 Onion diced
- 2 Cloves of garlic, chopped
- 100 g Wild mushrooms/ or shitake/ or chestnut diced
- 2-3 tbsp Mascarpone cheese
- Chopped flat leaf parsley
- Season with sea salt and cracked black pepper
Fresh pasta recipe
- 3 Large free-range eggs
- 300 g Tipo ’00’ flour
- 1 Egg yolk for sealing the tortellini (Alternatively, you can use wonton pastry)
For the jus
- 1/2 glass Red wine
- 4 Fresh thyme sprigs
- 1 tbsp Honey
- 5 tbsp Balsamic vinegar
- 2 tbsp Worcestershire sauce
- 500 ml Beef stock
- Cornflour and water mix for thickening
To garnish
- 100 g Wild mushrooms, sautéed in some oil and butter
- 1 Head of bok choi, sautéed in some oil and butter
- A salad or herb of choice, I used chervil and edible flours here.
Instructions
- Place the flour on a board or in a bowl. Make a well in the centre and crack the eggs into it. Beat the eggs with a fork until smooth. Using the tips of your fingers, mix the eggs with the flour, incorporating a little at a time, until everything is combined. Knead the pieces of dough together – with a bit of work and some love and attention they’ll all bind together to give you one big, smooth lump of dough!
- You can also make your dough in a food processor if you’ve got one. Just throw everything in, whiz until the flour looks like breadcrumbs, then tip the mixture on to your work surface and bring the dough together into one lump, using your hands.
- Once you’ve made your dough you need to knead and work it with your hands to develop the gluten in the flour, otherwise, your pasta will be flabby and soft when you cook it, instead of springy and al dente.
- There’s no secret to kneading. You just have to bash the dough about a bit with your hands, squashing it into the table, reshaping it, pulling it, stretching it, squashing it again. You’ll know when to stop – it’s when your pasta starts to feel smooth and silky instead of rough and floury. Then all you need to do is wrap it in cling film and put it in the fridge to rest for at least half an hour before you use it. Make sure the cling film covers it well or it will dry out and go crusty round the edges (this will give you crusty lumps through your pasta when you roll it out, and nobody likes crusty lumps!).
- Roll out the pasta with a rolling pin if you don’t have a pasta machine. Make sure its thin enough as it will expand when boiled. And roll out as desired into long thin pieces until you can see your hand.